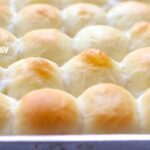
Ladi Pav | Soft, Eggless Dinner Rolls
Ladi Pav or Pav as it is called in India are soft, spongy eggless dinner rolls or slider buns eaten with a variety of Indian street food like pav-bhaji, vada-pav, dabeli, burger, or all by itself, smeared in butter with a cup of masala chai.
Servings: 4 people
Ingredients
- 2 cups All-purpose flour / Maida + 2-3 tablespoons for dusting
- 1 teaspoon Salt
- 1 ½ tablespoon Milk powder Also called dry milk
- 4 teaspoons Butter + ¼ teaspoon for brushing on Pav
- ¾ cup Milk + 1 tablespoon for brushing on Pav
- 2 teaspoons Yeast I used active dry yeast, you can use any kind
- 1 tablespoon Sugar
Instructions
- Prepare the yeast mixture.Warm ¾ cup of Milk. Make sure it's warm, not hot. Add 1 tablespoon of sugar and quickly dissolve it. Add 2 teaspoons of yeast. Keep it aside for 10 minutes. The yeast should bloom and this mixture will rise in 10 minutes.
- Mix flour, salt, dry milk powder, yeast mixture.Take 2 cups of flour in a bowl. Add salt, dry milk powder. Mix well. Make a well and add the above yeast mixture once it's ready.
- Form a dough, add butter, knead the dough for 15 minutes.Form it into a dough either using a stand mixer or by hand. Once the dough comes together, add 4 teaspoons of butter that is at room temperature. Knead the dough for another 15 minutes. The dough will initially be very sticky and wet.It is best to use a stand mixer if you have one. If not continue using hands. But make sure do not add extra flour or else the Pav will not be soft. Please see the note, in case. your dough is not sticky/wet/soft.
- Rest/Prove the dough for 45 minutes.Once the dough has been kneaded for 15 minutes, form a ball, place it into a bowl, brush some oil on the dough as well as on the side-walls of the bowl. Cover it well, making sure it doesn't dry up. Keep it aside for at least 45 minutes to rest. This process is called proofing/proving the dough.
- Form 16 dough balls.After the dough has rested for 45 minutes or more, dust a surface with some flour, put the dough on it, punch and knead it for a minute. After that, cut it into 16 equal pieces using a scraper or a knife. Make these into smooth round balls using palm of hands.
- Place dough balls in a baking tray, cover and leave it for resting/proving again for 45 minutes.Brush the insides of a square or a rectangle baking tray (with raised sides) with few drops of oil. In case you don't have a baking tray, you can also use any oven-safe container. Line the round dough balls in the tray next to each other. Don't squish it, but don't leave space in-between either. That will help the dough to rise vertically instead of sideways. Cover the tray with a damp cloth and let the dough balls rest for 45 minutes.
- Pre-heat the oven to 395 degrees Fahrenheit (about 200 degrees celcius).
- Bake the Pav.Once the dough balls have rested for 45 minutes, brush little milk on top of these. This will help with browning the tops when baking. Once the oven is heated, place the baking tray with the dough balls in the oven. Bake it for 15 minutes, brush some more milk on the top of the bread, bake for another 5 minutes. The bread tops should become brownish, but not too brown or else it will start drying up. To reach that level you may have to reduce or increase the baking time by a few minutes, depending upon the oven. In general, 20 minutes baking time should do the job.
- Remove from oven, brush some butter on top, Enjoy!Once done, take it out of the oven. Brush it with some butter. This will give a nice glow on the bread. After a few minutes, run a knife on the sides of the tray to remove the bread from the tray. Soft out of the oven pav is ready for devouring.
Notes
- I used the Kitchen-aid mxer to make the dough. I highly recommend using a stand-mixer in case you have one.
- Please note that the dough should be sticky and wet initially and after kneading it for 15 minutes, will become tacky and still remain soft. If your dough looks a bit dry/hard to begin with, please add more milk or water, else the pav will not be soft. The dough consistency depends on the flour - each flour brand is different. When I made it recently, the dough felt hard even with the same quantity of ingredients as mentioned in the recipe. Hence, I added more milk and brought it to a soft/wet consistency. The pav came out very nice and soft as a result.